
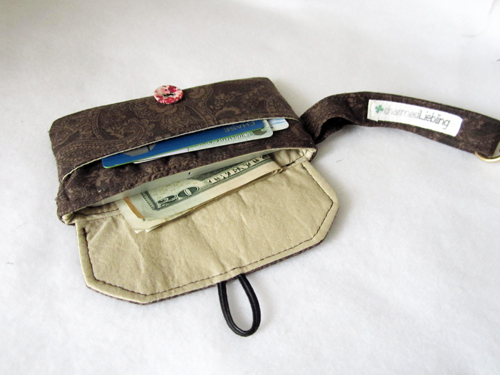
I promised to post this tutorial for my cute little travel sleeve before I go on vacation, so here it comes! It should be easy enough for a confident sewing beginner, but you should be familiar with the basic sewing terms ;-) Happy sewing!
This tutorial is free but if you would rather prefer to download this complete tutorial as a pdf file you may purchase it here for only $2.
This tutorial is free but if you would rather prefer to download this complete tutorial as a pdf file you may purchase it here for only $2.
You need:
Exterior fabric
Lining fabric
Fusible fleece (thin)
Fusible interfacing
1 button
1 snap hook
1 piece of elastic string, approx. 8 cm (3.25”)
Cut:
Note: these measurements are for iPhone 5 but you can adjust the size to your phone:
For the case take the measurements of your phone and add 5 cm (2”) to both length and width. Cut out your main fabric piece according to this size.
For the flap subtract 1 cm (3/8“) from the width of your main fabric piece. The length should be a little more than the third of the length of the main fabric piece.
For the front pocket take the width of your main fabric piece. As with the flap, the length should be a little more than the third of the length of the main fabric piece.
All measurements are length x width and fit an iPhone 5
exterior fabric:
for the case (main fabric piece): 1 piece of fabric 18 x 16 cm (7.25 x 6.25”)
for the flap: 1 piece of fabric 8 x 15 cm (3.25 x 5.75“)
for the front pocket: 1 piece of fabric 7 x 16 cm (2.75 x 6.25”)
for the strap: 1 piece of fabric 8 x 27 cm (3.25 x 10.75“)
lining fabric:
for the case (main fabric piece): 1 piece of fabric 18 x 16 cm (7.25 x 6.25”)
for the flap: 1 piece of fabric 8 x 15 cm (3.25 x 5.75“)
for the front pocket: 1 piece of fabric 7 x 16 cm (2.75 x 6.25”)
fusible interfacing:
for the lining case: 1 piece 18 x 16 cm (7.25 x 6.25”)
for the exterior flap: 1 piece 8 x 15 cm (3.25 x 5.75“)
for the lining front pocket: 1 piece 7 x 16 cm (2.75 x 6.25”)
fusible fleece:
for the exterior case: 1 piece 18 x 16 cm (7.25 x 6.25”)
Instructions:
All seam allowances are 1 cm (3/8“) unless stated otherwise.
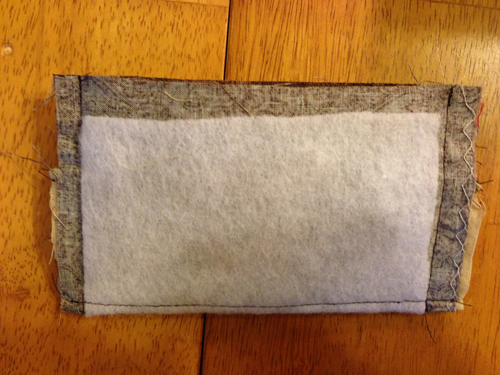
Interface all the fabric pieces with the respective interfacing and fleece pieces.
Exterior fabric
Lining fabric
Fusible fleece (thin)
Fusible interfacing
1 button
1 snap hook
1 piece of elastic string, approx. 8 cm (3.25”)
Cut:
Note: these measurements are for iPhone 5 but you can adjust the size to your phone:
For the case take the measurements of your phone and add 5 cm (2”) to both length and width. Cut out your main fabric piece according to this size.
For the flap subtract 1 cm (3/8“) from the width of your main fabric piece. The length should be a little more than the third of the length of the main fabric piece.
For the front pocket take the width of your main fabric piece. As with the flap, the length should be a little more than the third of the length of the main fabric piece.
All measurements are length x width and fit an iPhone 5
exterior fabric:
for the case (main fabric piece): 1 piece of fabric 18 x 16 cm (7.25 x 6.25”)
for the flap: 1 piece of fabric 8 x 15 cm (3.25 x 5.75“)
for the front pocket: 1 piece of fabric 7 x 16 cm (2.75 x 6.25”)
for the strap: 1 piece of fabric 8 x 27 cm (3.25 x 10.75“)
lining fabric:
for the case (main fabric piece): 1 piece of fabric 18 x 16 cm (7.25 x 6.25”)
for the flap: 1 piece of fabric 8 x 15 cm (3.25 x 5.75“)
for the front pocket: 1 piece of fabric 7 x 16 cm (2.75 x 6.25”)
fusible interfacing:
for the lining case: 1 piece 18 x 16 cm (7.25 x 6.25”)
for the exterior flap: 1 piece 8 x 15 cm (3.25 x 5.75“)
for the lining front pocket: 1 piece 7 x 16 cm (2.75 x 6.25”)
fusible fleece:
for the exterior case: 1 piece 18 x 16 cm (7.25 x 6.25”)
Instructions:
All seam allowances are 1 cm (3/8“) unless stated otherwise.
Interface all the fabric pieces with the respective interfacing and fleece pieces.
1. Make the strap:
Fold the fabric in half lengthwise and press. Open up again and fold the two long edges towards the center crease. Press again. Put the two long edges on top of each other and press again. Now topstitch along both long edges, approx. 0,3 cm (1/8“) from the edges. Slide a snap hook over the strap and set it aside.
Fold the fabric in half lengthwise and press. Open up again and fold the two long edges towards the center crease. Press again. Put the two long edges on top of each other and press again. Now topstitch along both long edges, approx. 0,3 cm (1/8“) from the edges. Slide a snap hook over the strap and set it aside.
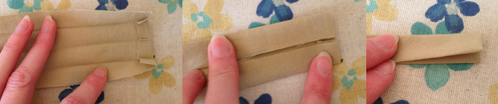
Use this pic from another pattern for help with the strap. Note that you DON'T have to fold down the short edges like it's shown here since they won't be visible later.
2. Make the flap:
Take your elastic string, fold it in half and put it onto the center right side of one of the long edges of the exterior flap fabric, with the loop lying on the fabric, and the open ends being aligned with the fabric raw edge. Baste in place.
Put the two flap pieces (lining and exterior) right sides together. Stitch along both short edges and the long edge on which you attached the elastic string. If you like, you can try a shape with an angle like I did (see first picture below).
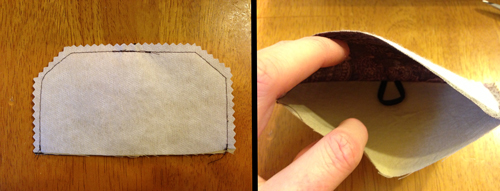
Left: Try sewing an angle at the corners of the flap for a nicer look. Right: Here you can see how the elastic string has to be positioned onto the exterior fabric right side.
Trim the seam allowances, turn right side out and press. Topstitch all around the edges of the flap, except for the raw edge, with a 0,3 cm (1/8“) seam allowance.
3. Make the front pocket:
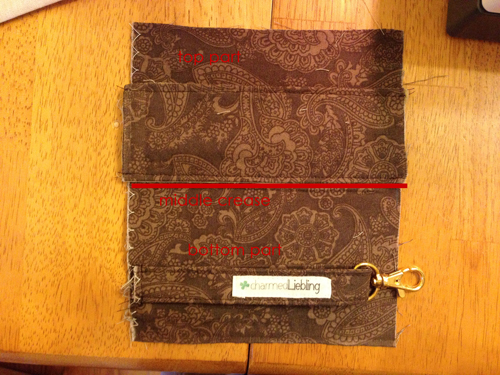
Put the two front pocket pieces right sides together and stitch along both long edges. Turn right side out and press. Topstitch along one of the long edges, with a 0,3 cm (1/8“) seam allowance. Place the front pocket with its wrong side (lining side) onto the front part of the exterior main piece. The bottom edge of the pocket should be aligned with the middle crease of the exterior main piece (see picture below). Sew the pocket onto the fabric by topstitching along the bottom long edge of the pocket.
Put the strap onto the exterior main fabric like shown on the picture and baste in place (it should be positioned approx. 2,5 cm (1“) down from the bottom corner).
4. Make the exterior case:
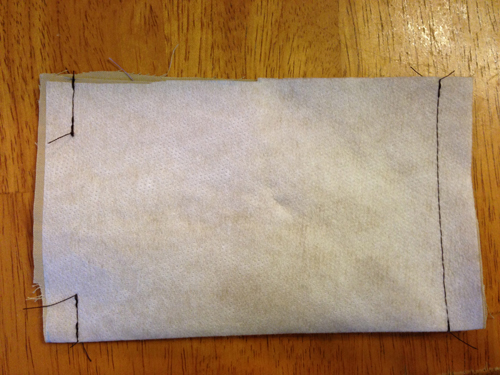
Fold the exterior fabric piece right sides together and stitch along both short edges. Make sure the strap is hidden between the two layers. Turn right side out and press.
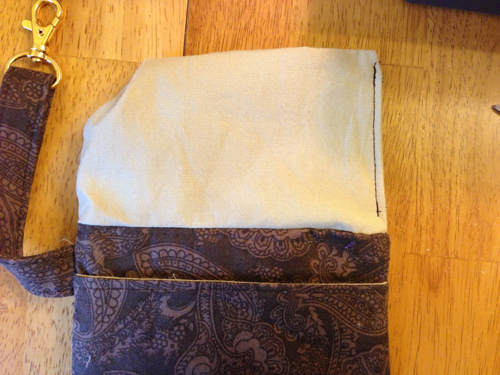
Take the flap and put it onto the back of the case, right sides together, with the raw edges aligned. Check the lenght of your flap by bending it over as if closing your case. If it appears too long, shorten it by cutting off from some fabric from the raw edge.
Pin in place and stitch with a 0,5 cm (0.25“) seam allowance.
Fold the exterior fabric piece right sides together and stitch along both short edges. Make sure the strap is hidden between the two layers. Turn right side out and press.
Take the flap and put it onto the back of the case, right sides together, with the raw edges aligned. Check the lenght of your flap by bending it over as if closing your case. If it appears too long, shorten it by cutting off from some fabric from the raw edge.
Pin in place and stitch with a 0,5 cm (0.25“) seam allowance.
 The exterior fabric piece folded in half, right sides together | 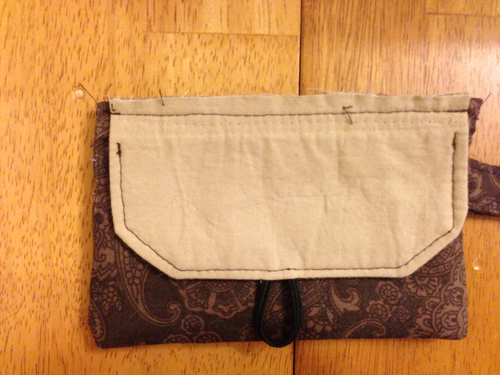 The flap stitched onto the top edge of the exterior back |
4. Make the lining case:
Fold the lining fabric piece right sides together and stitch along both short edges but leave an opening of approx. 7 cm (2.75“) on one side. Leave wrong side out.
5. Assemble the case:
Take the exterior case right side out and put it into the lining case. Both right sides should now be touching. Pin in place and stitch all around the top corner. Make sure the flap is tucked inside and hidden between the two layers.
Take the exterior case right side out and put it into the lining case. Both right sides should now be touching. Pin in place and stitch all around the top corner. Make sure the flap is tucked inside and hidden between the two layers.
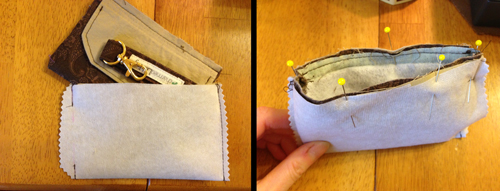 |  |
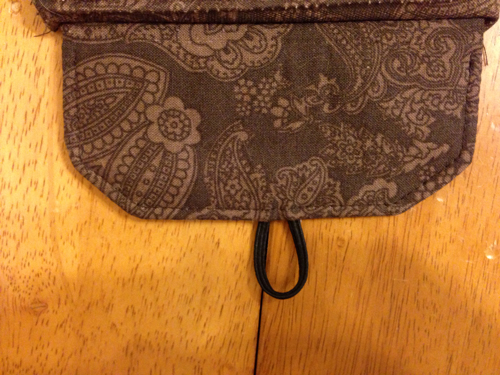
 Pull the exterior case through the opening in the lining case. Fold the seam allowances down towards the inside of the opening and topstitch/close it. | 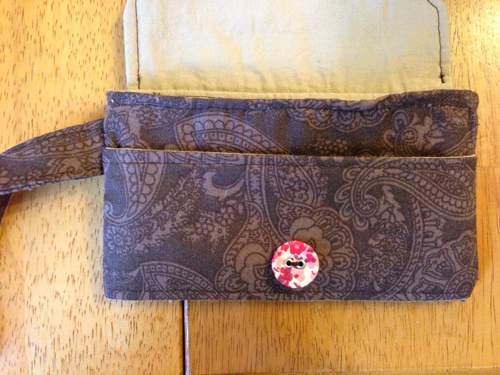 Tuck the lining case back into the exterior case and iron well, make sure to flatten out all bumps. Topstitch all around the top edge with a 0,3 cm (1/8“) seam allowance. |
Take your button and handstitch it onto the center front pocket.
...And it's done! Have fun with this cute iPhone sleeve/travel case or whatever name you think fits best! ;-)
I ended up using this little sleeve almost everyday.. and not only on vacation! I love the fact that I can carry it around as a small yet stylish purse but still have all my essentials with me. How did your "travel sleeve" turn out? I would love to hear your feedback on this tutorial!
If you would rather prefer to download this complete tutorial as a pdf file you may purchase it here for only $2.


 RSS Feed


