

So my original plan was to post a review of a bag pattern by Amy Butler (the blossom handbag/ shoulder bag) since I have already made two bags with this pattern. It is a really pretty bag pattern but I had some trouble with the instructions here and there and sort of improvised. As part of that, I used a different way to create a zippered pocket that goes into the blossom bag as a divider (see on the left picture). Since I had a little bit of trouble making this zippered divider following Amy's instructions, I decided to simply make a zippered pouch and insert that into the bag. Making a pouch like that is not really difficult but it can be a little tricky to get the exterior and lining fabric pieces all attached to the zipper in the right way, so I decided to post a tutorial about this first, before I share my experiences about the blossom bag with you ;-)
I hope this tutorial will help you to make a simple yet nice and practical zipper pouch.
--- For your convenience I decided to offer the complete tutorial as a PDF for download for only $2, if you prefer to have everything in one structured document ---
You will need
- two pieces of exterior fabric (decide on the size of your finished pouch and add approx. 1 cm
(3/8") for seam allowance on all four edges)
- two pieces of lining fabric (size: see above)
- two small pieces of fabric for the zipper tab, approx. 4 x 4 cm (1.5 x 1.5")
- one zipper, approx. 6 cm (2.5") shorter than the width of your fabric pieces
step 1) Prepare the zipper
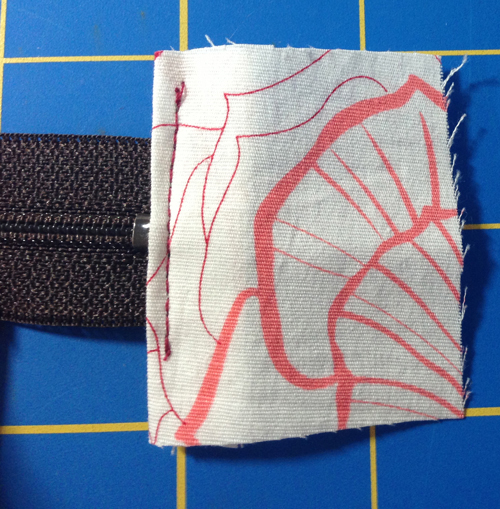
What I like to do first is add a sort of tab at both ends of the zipper. This is helpful later, when you sew the fabric pieces together because the zipper teeth won’t get in your way and your seams and edges of the pocket/pouch will look really neat!
On the two small pieces of fabric, fold down one of the edges toward the wrong side and put the tabs with those clean edges onto either end of the zipper. Pin you tabs down and topstitch along the clean edge.

If your zipper is too long, cut from the top part, just watch out you won’t lose your zipper head; I recommend handstitching the open ends together like this, so there’s a stop to the zipper head.
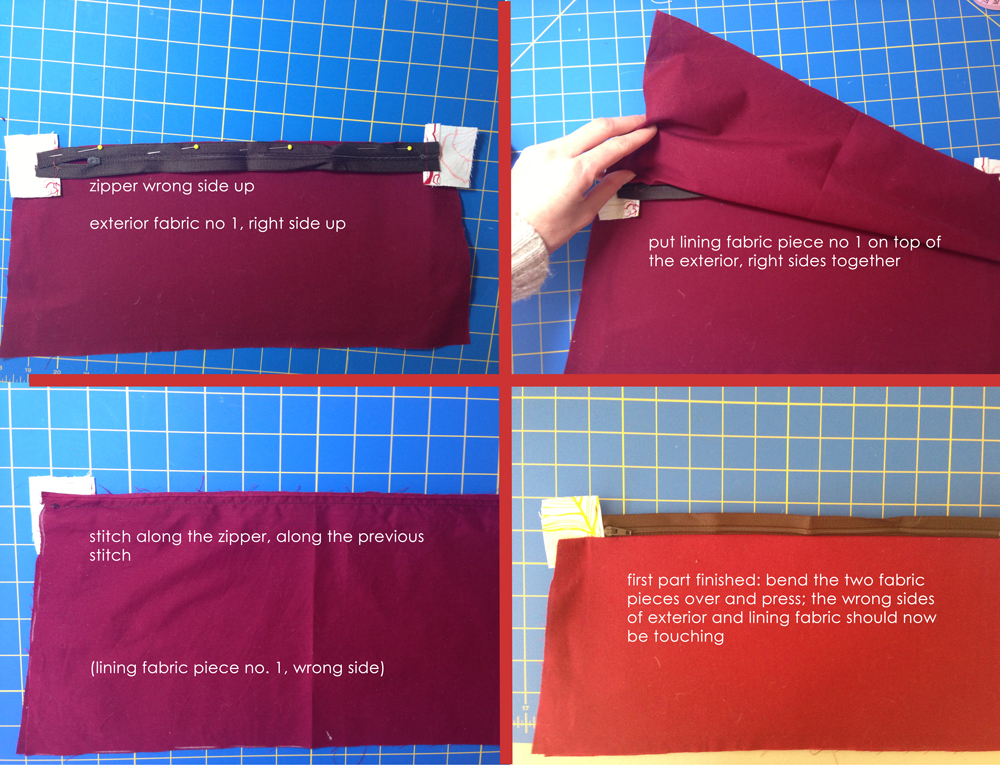
step 2) Attach exterior fabric piece no. 1 and lining fabric piece no. 1 to the zipper
Place one of the exterior fabric pieces right side up and put your zipper onto it, wrong side up and the edges matching. Pin down and stitch along the edge with your zipper foot of your sewing machine.
Put one of your lining fabric pieces wrong side up on top of the exterior fabric piece right and the zipper. The right sides of both exterior and lining fabric should now be touching. Make sure the edges match and pin in place. You will now be sewing along the previous stitching.
Fold the two fabric pieces over, so that you can see the zipper and press. One part of the zipper is now sandwiched in between the two fabric pieces. The two wrong sides of the exterior and lining fabric should now be touching.
helpful hint: follow pics from left to right, first top half, than bottom half ;-)
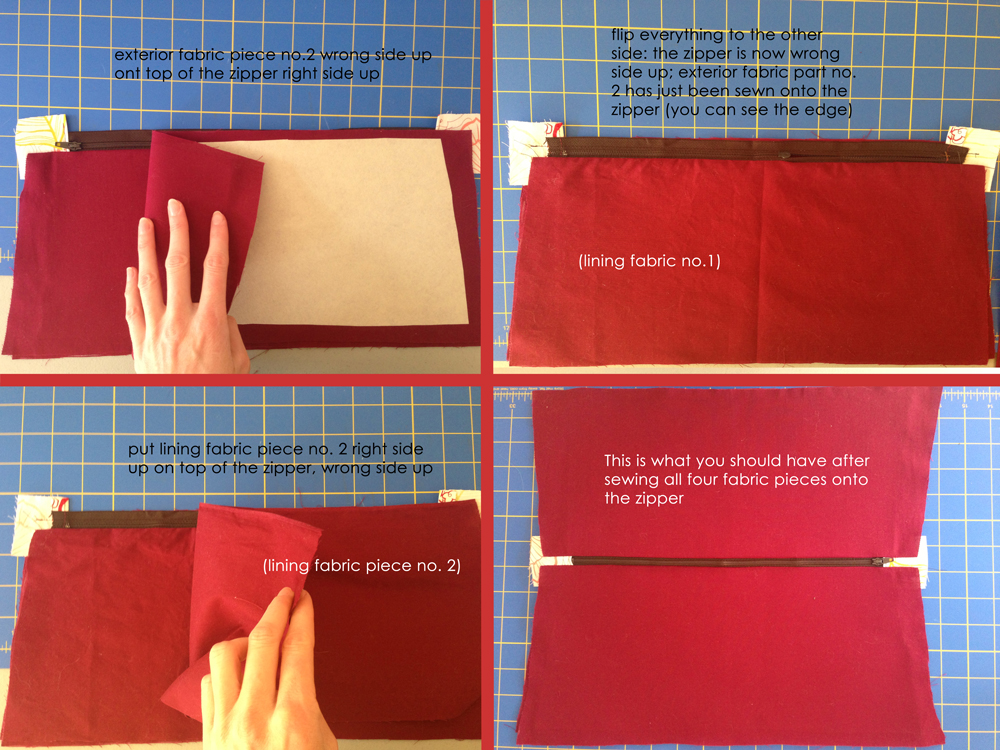
step 3) Attach exterior fabric piece no. 2 and lining fabric piece no. 2 to the zipper
The part you have just made should be right side up (you should be able to see the right side of the zipper with the zipper head and the exterior fabric piece)
Put your other exterior fabric piece wrong side up on top of the second edge of the zipper. Again the edges should be aligned, sew along the edge with the zipper foot of your sewing machine.
Now flip the whole piece over, so that the wrong side of the zipper is up. You should now see the lining fabric of the already finished part from step 2. The exterior fabric which you have just sewn onto the zipper should be hidden under all those layers.
Put the remaining lining fabric piece wrong side up on top of the zipper. Like in step 2, stitch along the zipper edge once again, directly on top of the previous stitching. Fold the fabric over again and press.
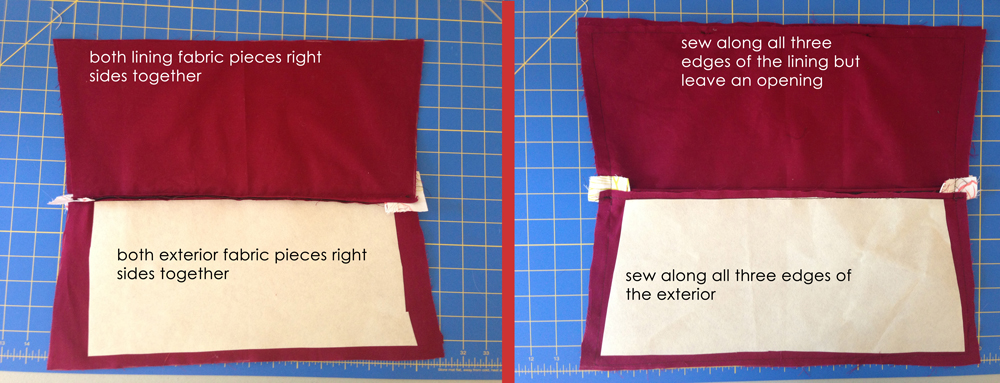
step 4) Finish up the bag
Now you will have to sew both the exterior fabric pieces and the lining fabric pieces together to create the actual pouch.
Open the zipper and put both exterior fabric pieces on top of each other and both lining fabric pieces on top of each other with their right sides together.
Pin in place and stitch all around the three edges of the exterior fabric pieces.
Do the same with the lining fabric pieces but leave an opening of approx. 10 cm (4”).
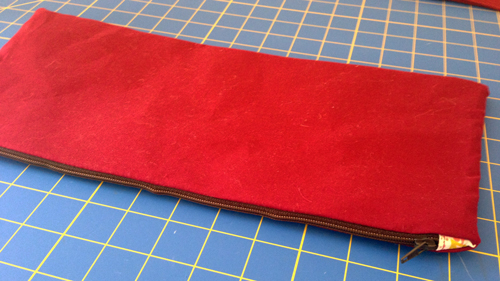
Turn the pouch inside out by pulling the exterior through the opening in the lining fabric part. Fold the seam allowance of the opening down towards the inside, pin in place and topstitch the opening close. Put the lining part into the exterior part and iron everything.
Your zipper pouch is now complete!
Your zipper pouch is now complete!


 RSS Feed


