
This is the second part of my series of tutorials on different kinds of pockets to add to your handmade handbag. For the first part ("How to make an inner elasticized pocket") click here.
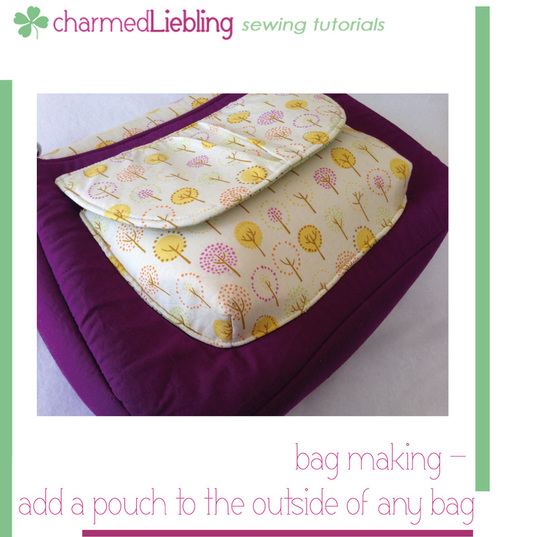
Customize your handmade handbag by adding a very practical and spacious pouch on either the front or the back! Not only is this pouch 3D-shaped so that you can fit more items into it – it also closes with a flap, to look more stylish and to make sure all your things stay in place.
I used this pocket in my All Day Out Bag sewing pattern. I like it because it gives you a little extra space for all the things you need to carry around.
--- If you would rather prefer to download this complete tutorial as a PDF file you may
purchase it here for only $2 ---
Finished measurements:
20 x 25 cm (8“ x 10“)
Please note: The bag you are making should measure at least 25 cm (10") in height and
28 cm (11") in width to make sure this pouch fits onto it.
The pouch will be attached to one of your main body panels. Make it and stitch it to your bag lining BEFORE assembling the handbag!
Please read all instructions before you begin.
All cutting measurements given are height x width.
All seam allowances are 1 cm (3/8”) unless stated otherwise.
Download the pattern pieces from the PDF file below and cut them out.
You need:
- Exterior fabric: 1 fat quarter
- Lining fabric: 1 fat quarter
- Fusible fleece e. g. Pellon 987F: a 20 x 55 cm (8” x 22”) piece is sufficient
- Fusible interfacing e. g. Pellon 931TD: 0.25 m (1/4 yd)
- 1 magnetic snap
- pattern pieces #1, #2 and #3 (download them from the PDF file below)
| pattern_pieces_pouch.pdf |
Cut:
From exterior fabric:
(1 x) pattern piece #1 on the fold – pouch
(1 x) pattern piece #2 on the fold – pouch flap (outer part, with pleats)
From lining fabric:
(1 x) pattern piece #1 on the fold – pouch
(1 x) pattern piece #3 on the fold – pouch flap (inner part, without pleats)
From fusible fleece:
(1 x) pattern piece #1 on the fold – pouch
(1 x) pattern piece #3 on the fold – pouch flap
From fusible interfacing:
(1 x) pattern piece #1 on the fold – pouch
(1 x) pattern piece #2 on the fold – pouch flap
Instructions
1) Make the pouch flap:
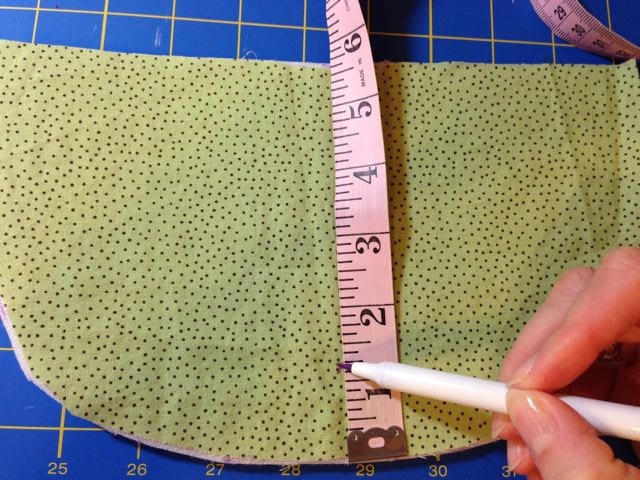
On the inner pouch flap piece (cut with pattern piece #3, the one you interfaced with fusible fleece) measure and mark 3 cm (1.25”) up from the bottom (rounded) center edge.
This spot marks the center of the magnetic snap, so make sure to position the snap with its center right on top of your marking.
Install the male part of the magnetic snap in that spot, following the manufacturer’s instructions. Set aside.
From exterior fabric:
(1 x) pattern piece #1 on the fold – pouch
(1 x) pattern piece #2 on the fold – pouch flap (outer part, with pleats)
From lining fabric:
(1 x) pattern piece #1 on the fold – pouch
(1 x) pattern piece #3 on the fold – pouch flap (inner part, without pleats)
From fusible fleece:
(1 x) pattern piece #1 on the fold – pouch
(1 x) pattern piece #3 on the fold – pouch flap
From fusible interfacing:
(1 x) pattern piece #1 on the fold – pouch
(1 x) pattern piece #2 on the fold – pouch flap
Instructions
1) Make the pouch flap:
On the inner pouch flap piece (cut with pattern piece #3, the one you interfaced with fusible fleece) measure and mark 3 cm (1.25”) up from the bottom (rounded) center edge.
This spot marks the center of the magnetic snap, so make sure to position the snap with its center right on top of your marking.
Install the male part of the magnetic snap in that spot, following the manufacturer’s instructions. Set aside.
 |  |
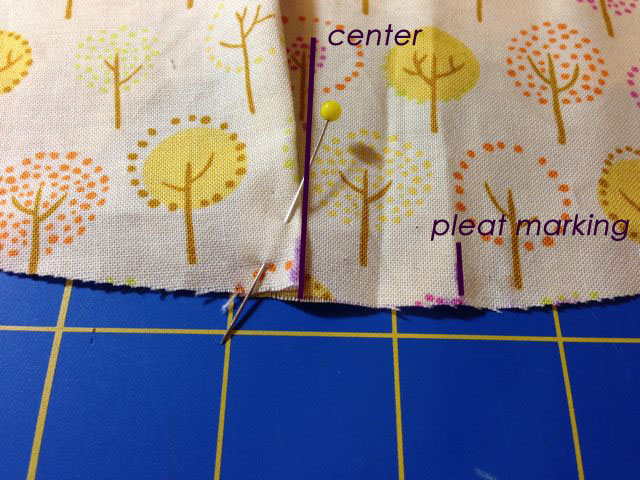
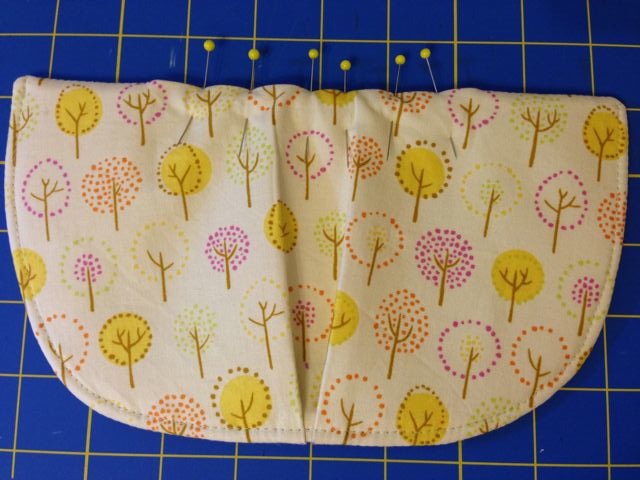
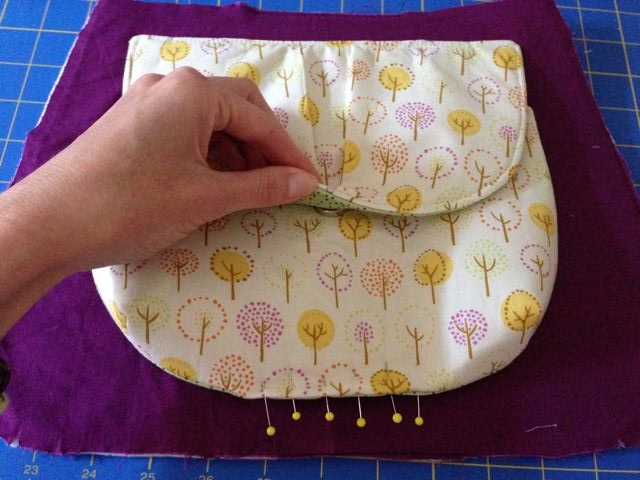
Fold the pleats at the bottom (rounded) edge of the outer pouch flap piece (cut with pattern piece #2):
On the left-hand side of the pouch flap, bring the marking for the pleat up and over to the center and pin the fold in place.
Repeat for the right-hand side pleat. Baste across the pleats at the bottom edge of the pouch flap (approx. 0.5 cm (3/16”) from the edges) to make sure they stay in place.
On the left-hand side of the pouch flap, bring the marking for the pleat up and over to the center and pin the fold in place.
Repeat for the right-hand side pleat. Baste across the pleats at the bottom edge of the pouch flap (approx. 0.5 cm (3/16”) from the edges) to make sure they stay in place.
Put the two pouch flap pieces right sides together, all edges matching.
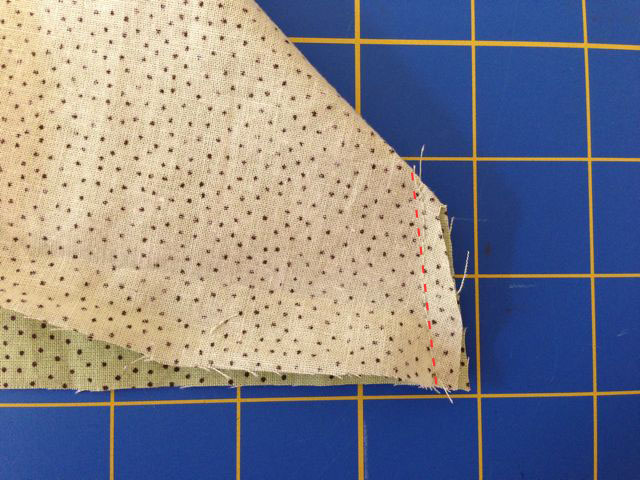
Pin in place and stitch around all edges of the flap but leave an opening of approx. 12 cm (4.75”) at the top edge. Trim the seam allowance and notch the curves (i. e. cut small “v”s into the fabric). Be careful not to cut into the stitching. Turn the flap right side out.
 |  |
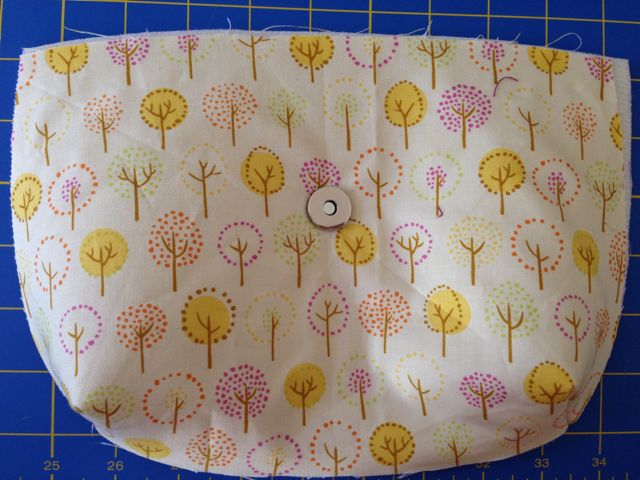
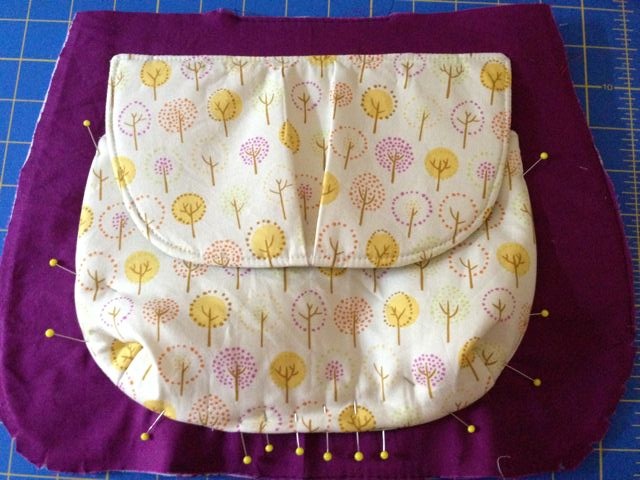
Fold the seam allowance of the opening down to the inside, pin in place and press the flap. Topstitch along the rounded edge of the flap using a 0.5 cm (3/16”) seam allowance. Set the pouch flap aside.
2) Make the pouch:
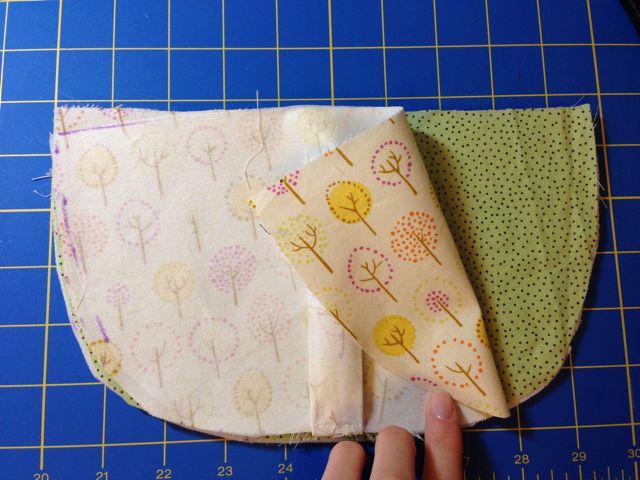
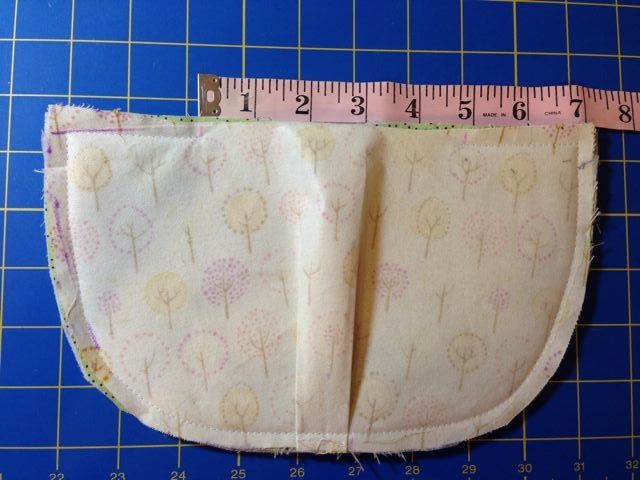
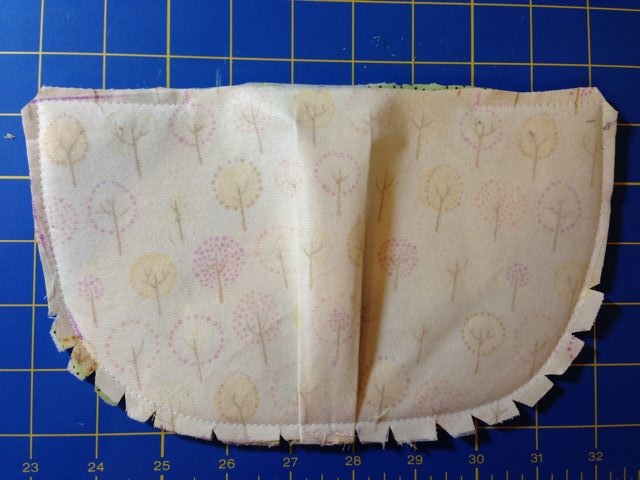
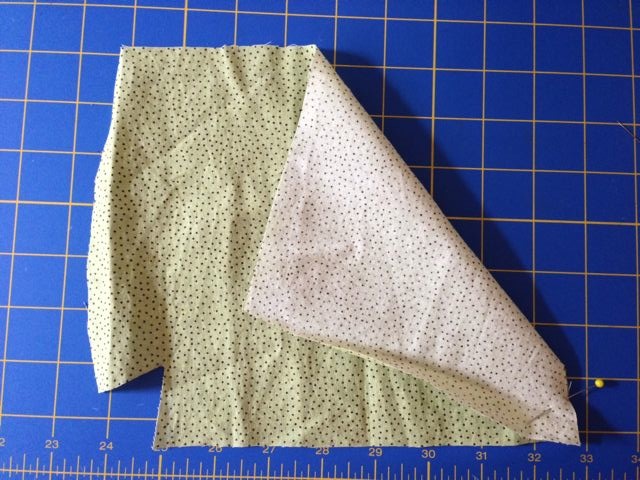
On one of the pouch pieces (cut with pattern piece #1), fold the top corner down so that the two edges of the bottom darts match. Pin in place and stitch along the straight edge of the dart. Repeat with the other edge of the fabric piece and then with the two edges of the second pouch piece.
On one of the pouch pieces (cut with pattern piece #1), fold the top corner down so that the two edges of the bottom darts match. Pin in place and stitch along the straight edge of the dart. Repeat with the other edge of the fabric piece and then with the two edges of the second pouch piece.
 |  |
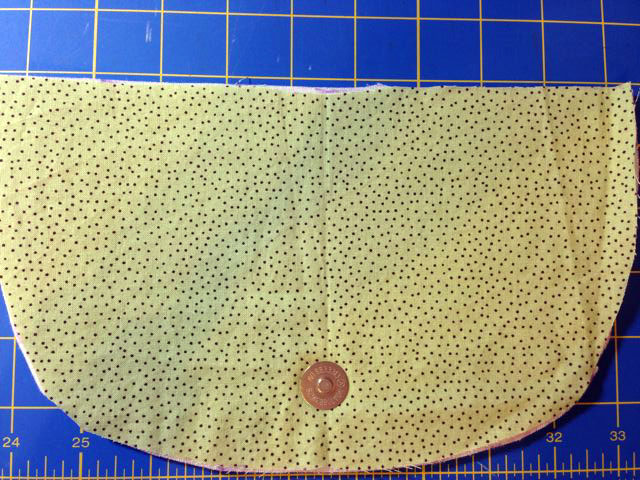
On the outer pouch piece (interfaced with fusible fleece) insert the female part of the magnetic snap by following the manufacturer’s instructions, at the spot you marked.
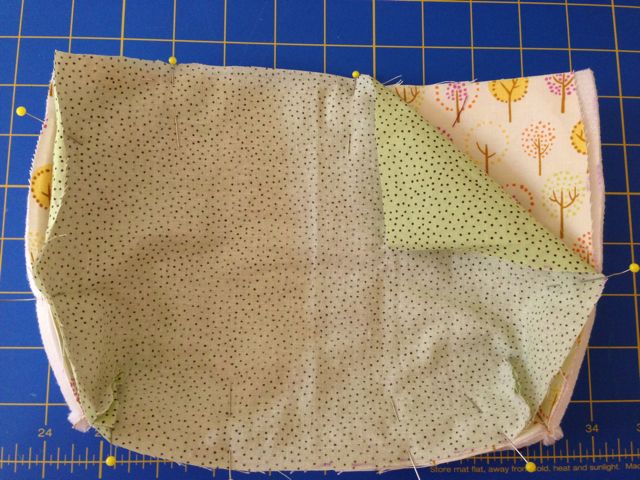
Put the two pouch pieces right sides together, all edges matching. Make sure the seams of the darts of both inner and outer piece match. Pin in place and stitch around the edges but leave an opening at the bottom edge of approx. 10 cm (4”). Clip the seam allowance on the curves.

Turn the pouch right side out through the opening. Fold the seam allowance of the opening down towards the inside and pin in place. Press and topstitch along the top edge of the pouch using a 0.5 cm (3/16”) seam allowance. Set aside.
3) Attach the pouch to the bag main body panel
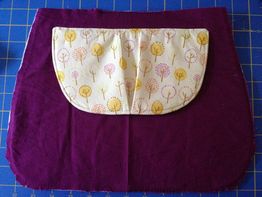
Decide where you want your pouch to be positioned on your bag and put the pouch flap with the pleated side up onto one of the exterior main body panels of your bag (the pouch flap should be at least 3.5 cm (1.25”) down from the top edge of the main body panel). Pin in place and attach the pouch flap to the main body panel by stitching along the straight top edge of the pouch flap, at the same time closing the opening of the pouch flap.
Put the pouch with the magnetic snap up onto the exterior main panel of your bag and match both parts of the magnetic snap (of pouch and pouch flap) as if closing the pouch. This is how you find the correct placement for the pouch. With the magnetic snap closed, make sure the pouch sits centered on the exterior main panel and that its top edge is straight. Pin the pouch in place.
Attach the pouch to the exterior main panel by stitching along the side edges, curves, and bottom edge, at the same time closing the opening at the bottom. Be careful when sewing over the corners to prevent pleats. Leave the top (straight) edge open.
Attach the pouch to the exterior main panel by stitching along the side edges, curves, and bottom edge, at the same time closing the opening at the bottom. Be careful when sewing over the corners to prevent pleats. Leave the top (straight) edge open.
 |  |
Your pouch is all set! Proceed with assembling your handbag.
If you would rather prefer to download this complete tutorial as a pdf file you may purchase it here for only $2.
--- I have received many emails with questions, tips and tricks on my tutorials. Thank you all! If you would like to weigh in with a short comment please feel free to let me know what you think of my tutorial below. I am interested to hear your feedback! ---


 RSS Feed


