
This tutorial is for all of you bag making lovers who like pockets in all varieties like me :)
It is the first part of my series of tutorials on different kinds of pockets to add to your handmade handbag. For the first part ("How to add a pouch with flap to the outside of your bag") click here.
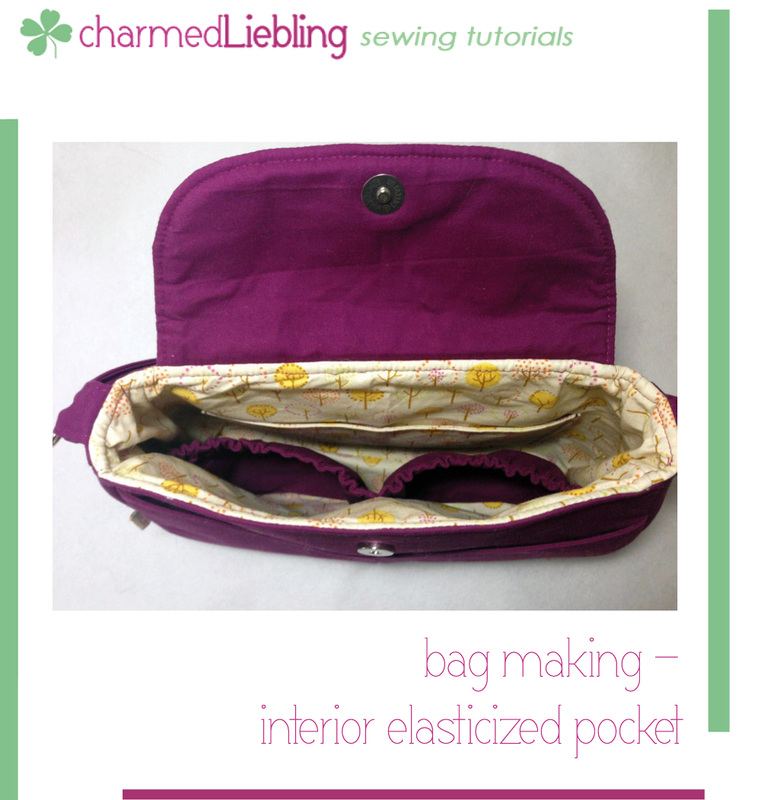
Customize your handmade handbag by adding a very practical and spacious elasticized pocket! Not only is this pocket 3D-shaped so that you can fit more items into it – it is also divided in the center for more convenience, to keep your things organized.
I used this pocket in my All Day Out Bag sewing pattern. What I like about this pocket is that it reaches across the whole width of the bag interior - plenty of room to arrange your stuff!
For this project you will need (measurements see below):
- 2 pieces of fabric
- 1 piece of elastic
Make the pocket and stitch it to your bag lining BEFORE assembling the bag!
1) In preparation you will have to cut two rectangular fabric pieces for your elasticized pocket:
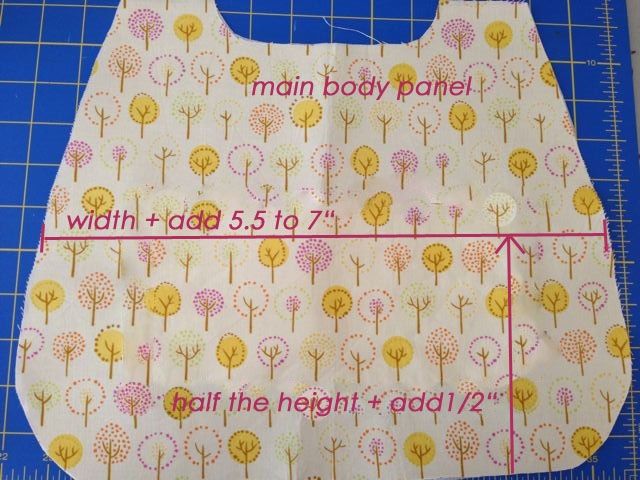
For the measurements for the pocket fabric pieces use the main body panel of your bag for help:
- For the height of the elasticized pocket decide on where you would like the top edge of the elasticized pocket to be. Measure this height from the bottom edge of the main body panel and add 1.5 cm (1/2").
(For a medium-sized bag I recommend using approx. half the height of your main body panel).
- For the width of the elasticized pocket use the width of your bag main body panel and add about 14 – 18 cm (5 ½ – 7”).
→ Cut 2 rectangles of that size so that you have two pieces for the elasticized pocket.
→ Cut 1 piece of elastic (length: about 3/4 of the width of the main body panel).
It is the first part of my series of tutorials on different kinds of pockets to add to your handmade handbag. For the first part ("How to add a pouch with flap to the outside of your bag") click here.
Customize your handmade handbag by adding a very practical and spacious elasticized pocket! Not only is this pocket 3D-shaped so that you can fit more items into it – it is also divided in the center for more convenience, to keep your things organized.
I used this pocket in my All Day Out Bag sewing pattern. What I like about this pocket is that it reaches across the whole width of the bag interior - plenty of room to arrange your stuff!
For this project you will need (measurements see below):
- 2 pieces of fabric
- 1 piece of elastic
Make the pocket and stitch it to your bag lining BEFORE assembling the bag!
1) In preparation you will have to cut two rectangular fabric pieces for your elasticized pocket:
For the measurements for the pocket fabric pieces use the main body panel of your bag for help:
- For the height of the elasticized pocket decide on where you would like the top edge of the elasticized pocket to be. Measure this height from the bottom edge of the main body panel and add 1.5 cm (1/2").
(For a medium-sized bag I recommend using approx. half the height of your main body panel).
- For the width of the elasticized pocket use the width of your bag main body panel and add about 14 – 18 cm (5 ½ – 7”).
→ Cut 2 rectangles of that size so that you have two pieces for the elasticized pocket.
→ Cut 1 piece of elastic (length: about 3/4 of the width of the main body panel).
2) Assemble the elasticized pocket (all seam allowances are 1 cm (3/8”) unless stated otherwise):
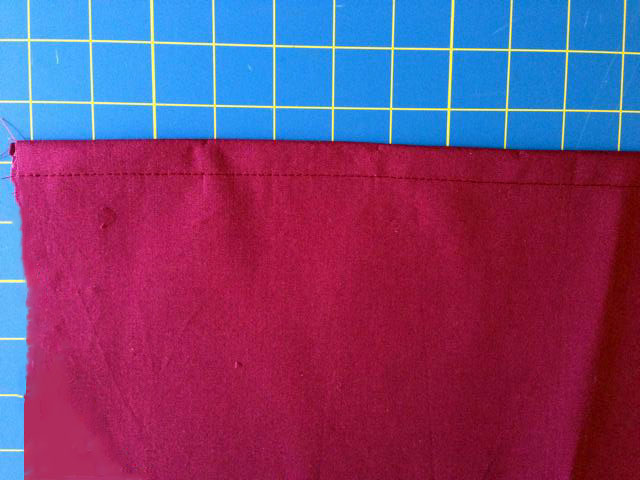
Put the two fabric pieces for the elasticized pocket right sides together, all edges matching. Pin in place and stitch along the top edge. Fold the pocket right side out and press.
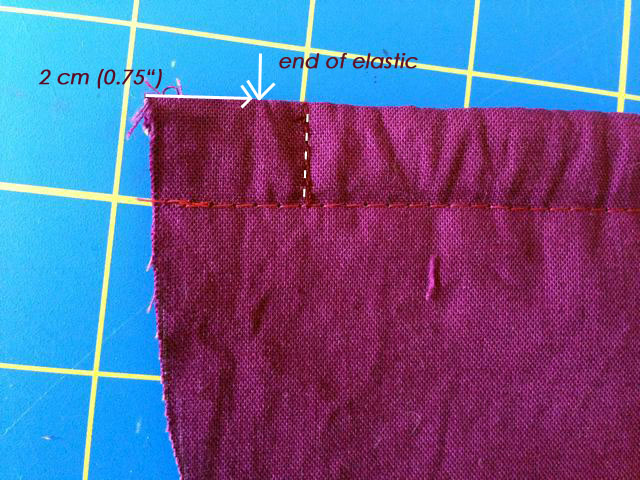
Measure and mark a horizontal line 1.5 cm (0.5“) down from the top edge. Topstitch along this line to create a channel for the elastic.
Put the two fabric pieces for the elasticized pocket right sides together, all edges matching. Pin in place and stitch along the top edge. Fold the pocket right side out and press.
Measure and mark a horizontal line 1.5 cm (0.5“) down from the top edge. Topstitch along this line to create a channel for the elastic.
 |  |
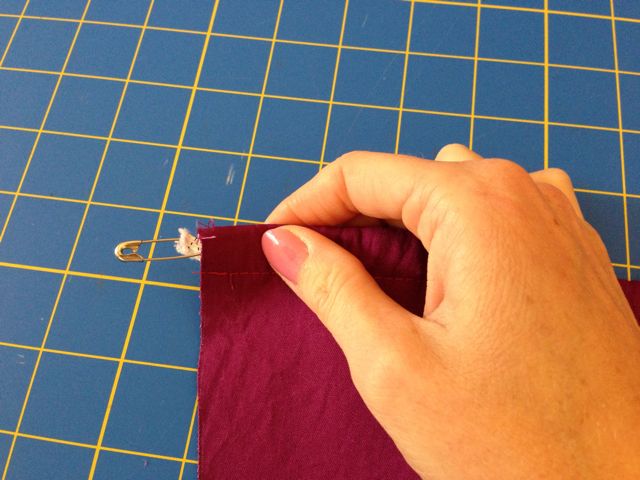
3) Attach a safety pin to each end of your piece of elastic. Pull the elastic through the channel you created on the top edge of your fabric piece.
Remove the safety pin from one end and carefully let the elastic slide into the channel so that it ends approx. 2 cm (3/4”) in from the side edge of the fabric. At 2.5 cm (1“) in from the side edge, topstitch down until you reach the bottom stitching of the channel, at the same time fastening the elastic.
Remove the safety pin from one end and carefully let the elastic slide into the channel so that it ends approx. 2 cm (3/4”) in from the side edge of the fabric. At 2.5 cm (1“) in from the side edge, topstitch down until you reach the bottom stitching of the channel, at the same time fastening the elastic.
 |  |
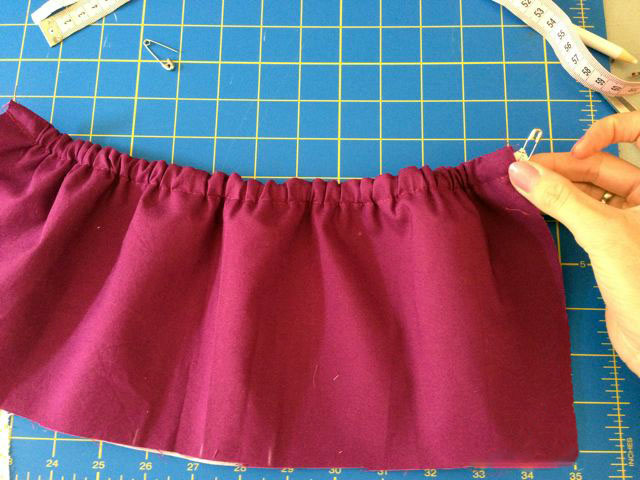
4) The other end of the elastic will be in the channel. Pull it out at the safety pin. Tighten the elastic until the width of the top part of the pocket has the same width as the main body panel (see also last picture of this tutorial for reference).
Again, keep the elastic in place with your finger and topstitch down 2.5 cm (1”) in from the side edge, until you reach the bottom stitching of the channel to fasten the elastic.
Again, keep the elastic in place with your finger and topstitch down 2.5 cm (1”) in from the side edge, until you reach the bottom stitching of the channel to fasten the elastic.
 | 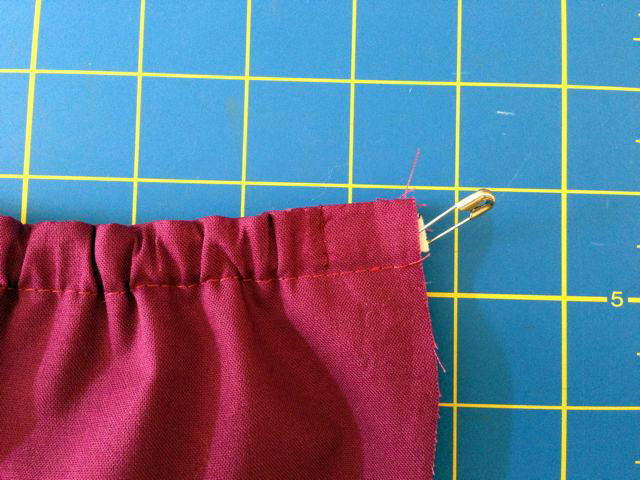 |

5) Remove the second safety pin. Pull the fabric of the channel back to the stitching and trim the excess elastic.
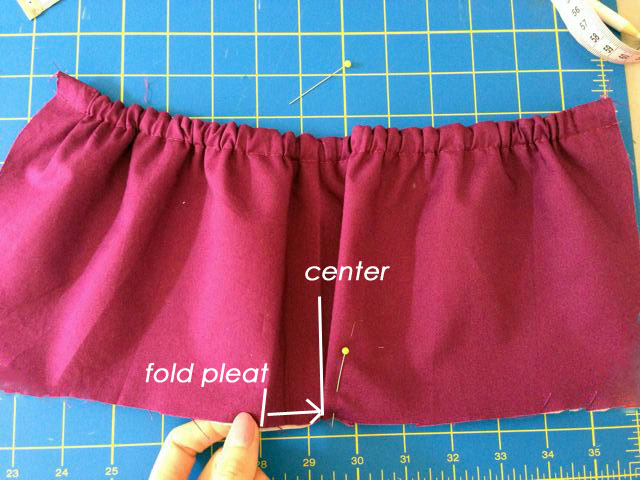
6) To get the bottom edge of the elasticized pocket to be the same width as your main body panel, fold pleats at the bottom edge:
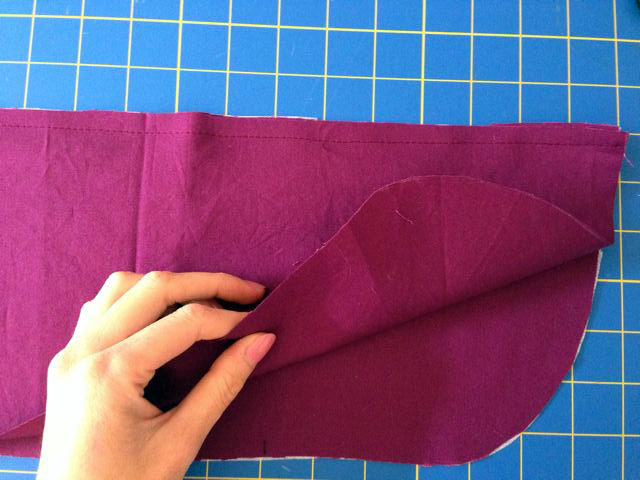
Place the pocket onto your main body panel and align the bottom edge and the side edges of both pieces. This way you will have excess fabric at the bottom, which you will use to create the pleat: On the right-hand side of the pocket, bring this excess fabric up and over to the center of the pocket and pin the fold in place.
In the picture to the right you can see the right-hand side pleat already folded and the left-hand side pleat still unfolded.
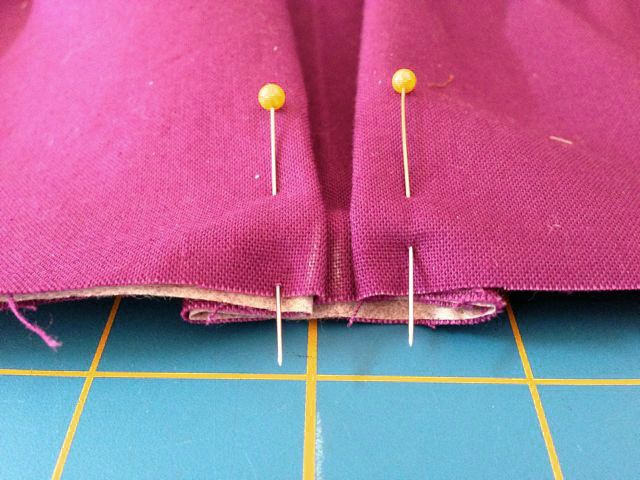
7) Repeat for the left-hand side pleat. Baste across the pleats at the bottom edge of the pocket (approx. 0.5 cm (3/16”) from the edges) to make sure they stay in place
8) Before proceeding make sure to distribute the elastic evenly over the whole width of the pocket.
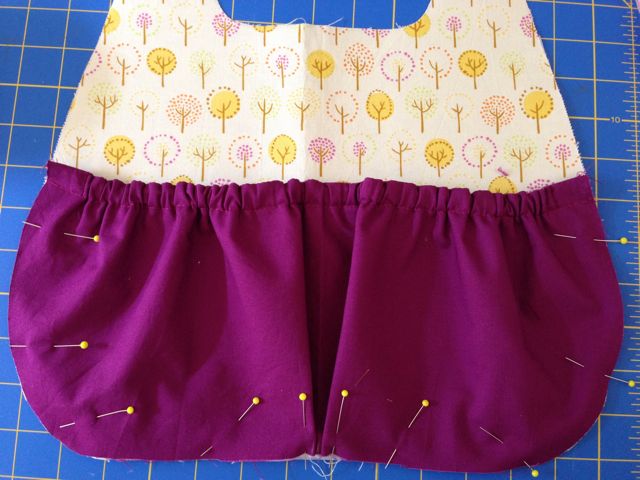
Place the main body panel right side up. Place the elasticized pocket onto it, with the pleats facing up. The side edges, and bottom edge of both pieces should be aligned. Pin the pocket in place and attach it to the lining main body panel by stitching along the side edges and the bottom edge using a 0.5 cm (3/16”) seam allowance.
If your main body panel does not have a rectangular shape but curved edges like mine, you can trim off the excess fabric of the pocket after pinning it down onto the main body panel like shown in the picture below.
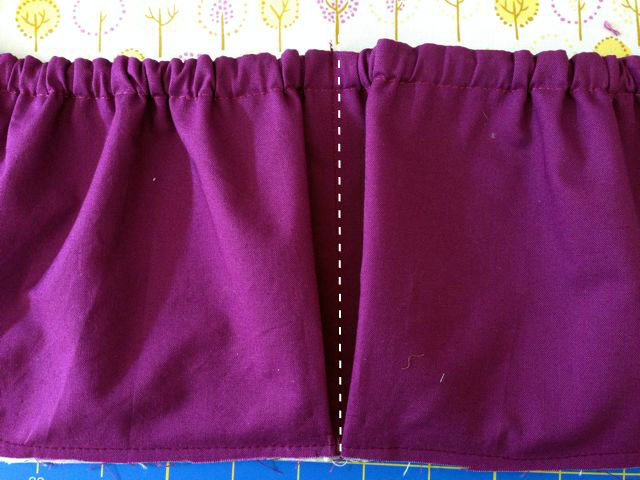
To get two compartments, topstitch down from the center of the pocket.
Place the main body panel right side up. Place the elasticized pocket onto it, with the pleats facing up. The side edges, and bottom edge of both pieces should be aligned. Pin the pocket in place and attach it to the lining main body panel by stitching along the side edges and the bottom edge using a 0.5 cm (3/16”) seam allowance.
If your main body panel does not have a rectangular shape but curved edges like mine, you can trim off the excess fabric of the pocket after pinning it down onto the main body panel like shown in the picture below.
To get two compartments, topstitch down from the center of the pocket.
 |  |
Your elasticized pocket is all set! Proceed with assembling the lining part of your handbag.
If you would rather prefer to download this complete tutorial as a pdf file you may purchase it here for only $2.
I hope you enjoyed this tutorial. Thanks for reading and happy sewing!
If you would rather prefer to download this complete tutorial as a pdf file you may purchase it here for only $2.
I hope you enjoyed this tutorial. Thanks for reading and happy sewing!


 RSS Feed


