
--- This tutorial is FREE but for your convenience I decided to offer the complete tutorial as a PDF for download for only $2, if you prefer to have everything in one structured document ---

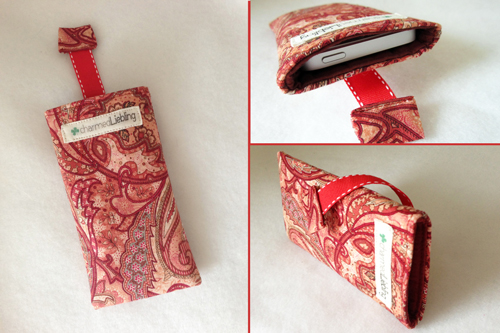
So, I've been asked quite a few times how I made my cute iPhone case, that I finally decided to make a tutorial! This project is fairly easy, someone with basic sewing skills should have no problem, even though I have to say that it involves a little bit of fiddly work... but you'll see later ;-)
I've also posted about those sleeves before, first when I came up with the design (read here) and the second time when I made the one for my new iPhone (read here).
I've also posted about those sleeves before, first when I came up with the design (read here) and the second time when I made the one for my new iPhone (read here).
You need:
exterior fabric
lining fabric
fusible interfacing (e. g. Pellon 950F)
optional: fusible fleece (some that is rather thin) if you want to add extra strength
a piece of ribbon: 1,5 cm (5/8”) wide
All seam allowances are 1 cm (3/8”) unless otherwise stated!
O.k. there’s gonna be exactly two tricky parts to this smartphone sleeve, but don’t worry, if I can do it, so can you! Since every phone has a different size I can’t give you the exact measurements for your phone case, you will have to figure them out by yourself. I’ll provide you with the right formula though, so the first thing you wanna do is a little math (also known as the first tricky part):

step a) The right size of exterior and lining fabric depends on the size of your phone. Let’s take the measurements of my phone as an example:
height (12.5 cm or 5")
width (6 cm or 2 3/8 ")
depth (0.8 cm or 0.25")
Note: Forgive me America, but I still get confused about how you guys count inches correctly since they are counted in eighths, so to prevent mistakes I will only use centimeters in my example. What's important is the formula anyway, so I'm sure you will figure it out for inches just as easily :-P
1. To determine the width of your fabric:
take 1 x the width of your phone + 2 x the depth of your phone + 2 x seam allowance of 1 cm (3/8”)
in my case I'd have to count:
6 cm (1x width) + 2 x 0.8 cm (2 x depth) + 2 x 1 cm (2 x seam allowance) = 9.6 cm total
2. To determine the height of your fabric:
take 2 x the height of your phone + 1 x the depth of your phone + an extra 2 cm (0.75”) + 2 x seam allowance of 1 cm (3/8”)
in my case I'd have to count:
2 x 12,5 cm (2 x height)+ 0.8 cm (1 x depth) + an extra 2 cm + 2 x 1 cm (2 x seam allowance)
= 29.8 cm total
→ in my case, the fabric piece should measure 9.6 x 29.8 cm (3.75 x 11.75”)
Now cut out your exterior fabric piece and your lining fabric piece according to your own
measurements
step b) Find out the right length for the piece of ribbon:
take the heigth of your phone and add about 8 cm (3”)
in my case: 12.5 cm/5” (height) + 8 cm/3" = 20.5 cm/8"
→ the ribbon I need would be about 20.5 cm (8”) long. Add some extra cm/inches to be on the safe side, if you are not quite sure. You can still adjust the right length later.
step c) Interface the wrong sides of the exterior and the lining fabric pieces with your interfacing (and fusible fleece if you're using it. I recommend cutting 1cm (3/8”) off all the edges of the fusible fleece to prevent too much bulk on the seam allowance).
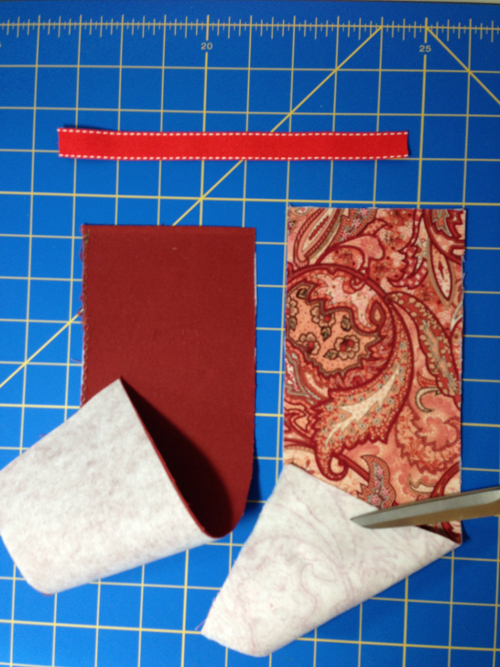
This is what you should have ready by now:
the ribbon, the lining fabric (on the left) and the exterior fabric (on the right), both with fusible interfacing attached onto the wrong side. I didn't use fusible fleece for this phone case.
step d) Make the openings for the ribbon pull-tab:
Take your exterior fabric, measure and mark 3 cm (1.25”) down from the top edge center. This is where to the top edge of the opening will be. Now draw a rectangle of 2 x 3 cm (0.75 x 1.25”) onto the fabric, make sure it’s right in the middle.
Take your exterior fabric, measure and mark 3 cm (1.25”) down from the top edge center. This is where to the top edge of the opening will be. Now draw a rectangle of 2 x 3 cm (0.75 x 1.25”) onto the fabric, make sure it’s right in the middle.
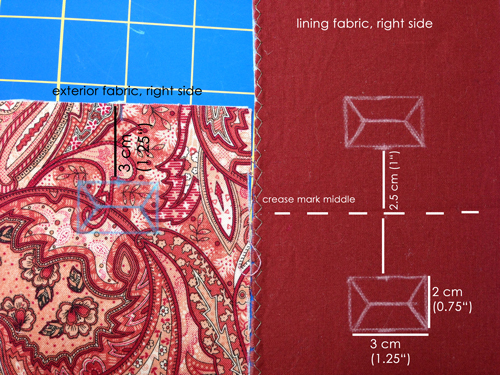
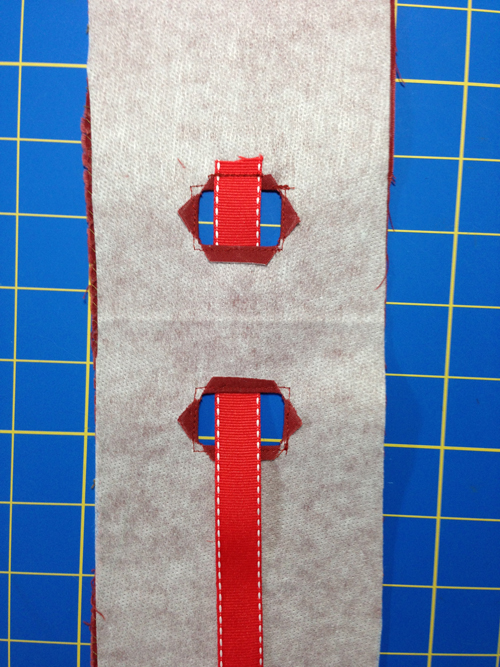
The lining will have two openings for the pull-tab:
Take your lining fabric, fold it in half with the short edges right sides together and press, so you know where the middle of the piece is. Open up again and measure and mark 2,5 cm (1”) from this ironed crease towards both sides. Again draw rectangles of 2 x 3 cm (0.75 x 1.25”) onto the fabric, make sure, they’re right in the middle.
Take your lining fabric, fold it in half with the short edges right sides together and press, so you know where the middle of the piece is. Open up again and measure and mark 2,5 cm (1”) from this ironed crease towards both sides. Again draw rectangles of 2 x 3 cm (0.75 x 1.25”) onto the fabric, make sure, they’re right in the middle.
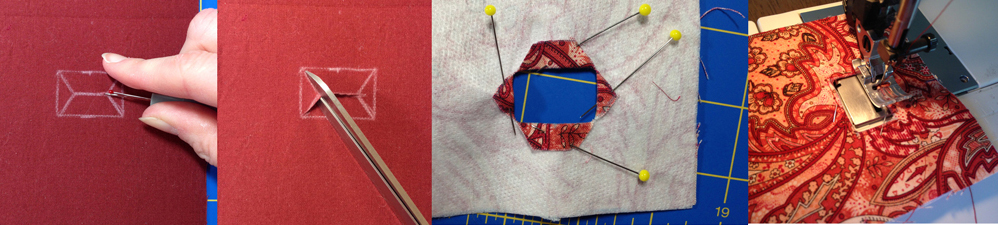
Draw a horizontal line across the rectangulars, with both ends merging into a triangular shape.
This is where you are going to be cutting to make the opening: take your seam ripper to get a small hole started and then cut all along the horizontal and the triangular lines.
Fold the fabric down and pin in place. Topstitch close to the edges of the rectangular (approx. 0,2 cm or 1/8 “), at the same time stitching the little fabric pieces to the wrong side of the fabric, so that they are out of the way and you create a neat opening.
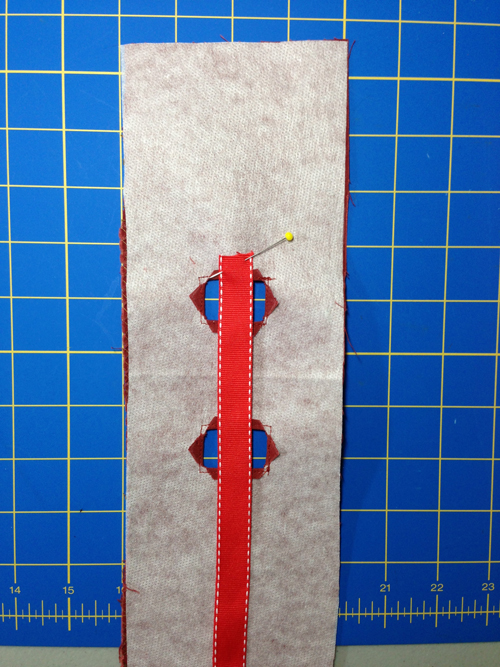
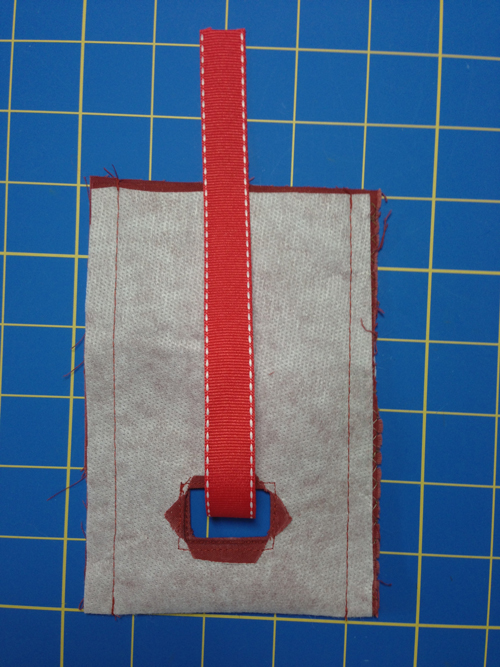
step e) Attach the ribbon to the lining fabric:
Put one end of the ribbon onto the wrong side of the lining fabric. It should be positioned above the top edge of the opening, like you can see it on the right picture.
Pin in place and stitch the ribbon to the lining fabric.
Now pull the other end of the ribbon through BOTH openings of the lining fabric, like this:
step f) Fold the lining fabric right sides together, pin and stitch both long edges (see picture on the left).
Now is a good time to check if your case really fits our phone. Take your phone and put it inside the lining case that you have just made (don’t turn the lining case right side out, leave it like it is, wrong side out). Your phone should fit snug in there, it should neither be shaking around nor sit all too tight inside the case. If necessary fix the width of your case.
Trim the seam allowances and put the lining case aside.
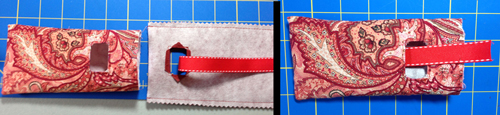
Do the same with the exterior fabric piece: fold the exterior fabric right sides together, pin and stitch along both long edges (make sure the width is the same as with the lining case, in case you adjusted it). Trim the seam allowances and turn it right side out. You should now have two cases.
step g) Put it all together:
Take the lining case and put it into the exterior case, both wrong sides should touch. Take the end of the ribbon and pull it through the opening of the exterior case:
step g) Put it all together:
Take the lining case and put it into the exterior case, both wrong sides should touch. Take the end of the ribbon and pull it through the opening of the exterior case:
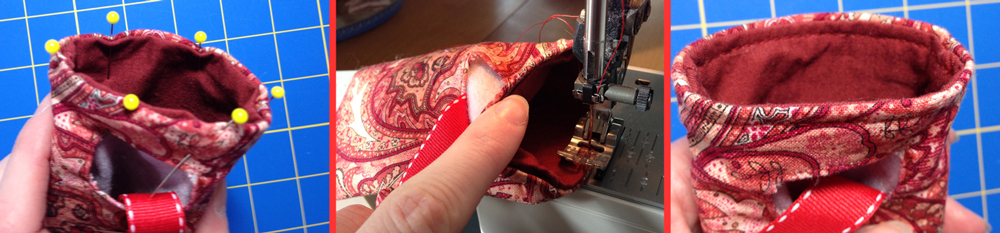
If necessary, trim your piece of ribbon. Put your phone into the case to make sure the ribbon is all the way inserted into the case. I like mine not to be longer than 6 cm (2 3/8"), measuring from the bottom edge of the exterior opening (basically measuring from where the ribbon is visible/comes out of the exterior opening).
Now comes tricky part number 2 (also referred to as the fiddly work): fold the top raw edges of your phone case towards the inside (lining and exterior fabric are touching with their right sides) and topstitch all around the top edge. Try using pins and/or your fingers to hold the two fabric layers in place while sewing around. Take your time. Don’t freak out (I do sometimes). It’s not that easy to create a neat stitching line, because of the small dimensions of the opening of the sleeve but you’re gonna make it happen! ;-)
Now comes tricky part number 2 (also referred to as the fiddly work): fold the top raw edges of your phone case towards the inside (lining and exterior fabric are touching with their right sides) and topstitch all around the top edge. Try using pins and/or your fingers to hold the two fabric layers in place while sewing around. Take your time. Don’t freak out (I do sometimes). It’s not that easy to create a neat stitching line, because of the small dimensions of the opening of the sleeve but you’re gonna make it happen! ;-)
step h) Yay, you’re almost finished! Make a nice tab for the ribbon:
Take a small piece of exterior fabric of 6 x 4 cm (2.5 x 1.5”).
Fold it in half by putting the short edges right sides together. Stitch along both sides edges. Fold the raw open edges down and press. Turn right side out.
Take this little "cover" and put the end of the ribbon inside. Topstitch the open end, this way attaching the ribbon to the tab and at the same time closing the open end.

Congratulations! Your smartphone sleeve is finished!
Did you enjoy this tutorial? Or do you have any suggestions for improvement? I would love to hear your opinion :-)
Did you enjoy this tutorial? Or do you have any suggestions for improvement? I would love to hear your opinion :-)


 RSS Feed


